Progressive lenses are the perfect solution for people with presbyopia who want to avoid the visible line of traditional bifocal lenses. However, it’s important to make sure that the progressive lenses your patients purchase are correctly made and fit their needs. One way to do this is by using a layout chart or cutout chart. In this article, we’ll explain what a layout chart is, why it’s important to use it, and how to use it to verify your patients progressive lenses.
What is a Layout Chart or Cutout Chart?
A layout chart or cutout chart is a tool used by ophthalmologists, optometrists and lens technicians to check the accuracy of progressive lenses. It consists of a series of cutouts that simulate the different lens points needed for reading, intermediate, and distance vision. The layout chart is used to check the size and position of the progressive add, the reading segment, and the distance portion of the lens.
Why is it Important to Use a Layout Chart?
Progressive lenses are more complex than traditional single-vision lenses, and their prescription is unique to each individual. As a result, it’s crucial to make sure that the progressive lenses your patients receive are made to the correct specifications. Using a layout chart can help you verify that the lenses are made correctly and that an individual have clear, comfortable vision with them.
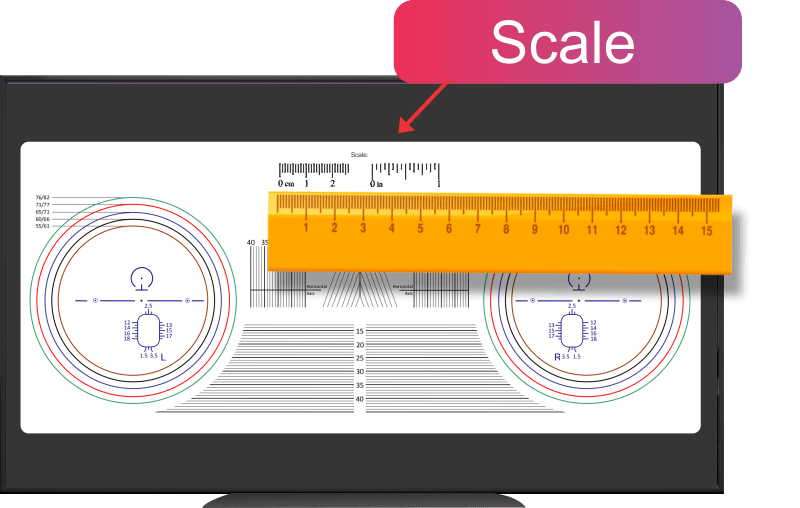
How to configure the Cutout Chart size?
It’s important to note that your EyeCharts Cutout Chart need to be configured to the size of your Screen. If your EyeCharts software was not yet configured, you need to go to EyeCharts settings page and configure the size of your Screen. You can also use the scale of the Cutout Chart page. With a ruler, check if it fits with the scale ruler, as shown in the figure below.
How to Use a Layout Chart to Verify Progressive Lenses?
Here are the steps to follow when using a layout chart to verify your progressive lenses:
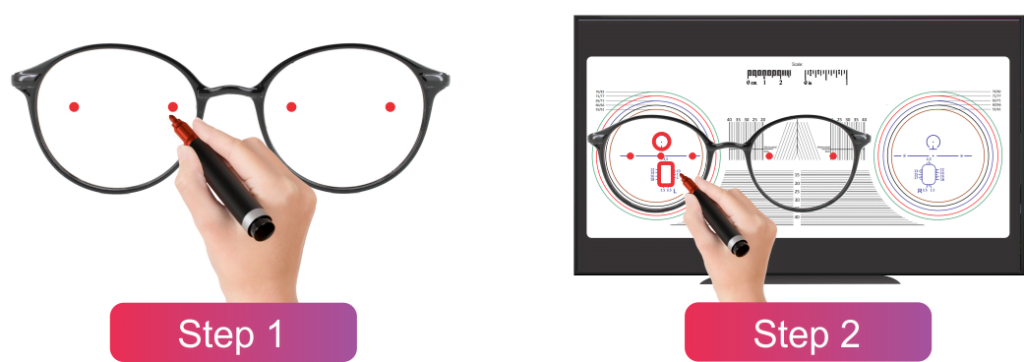
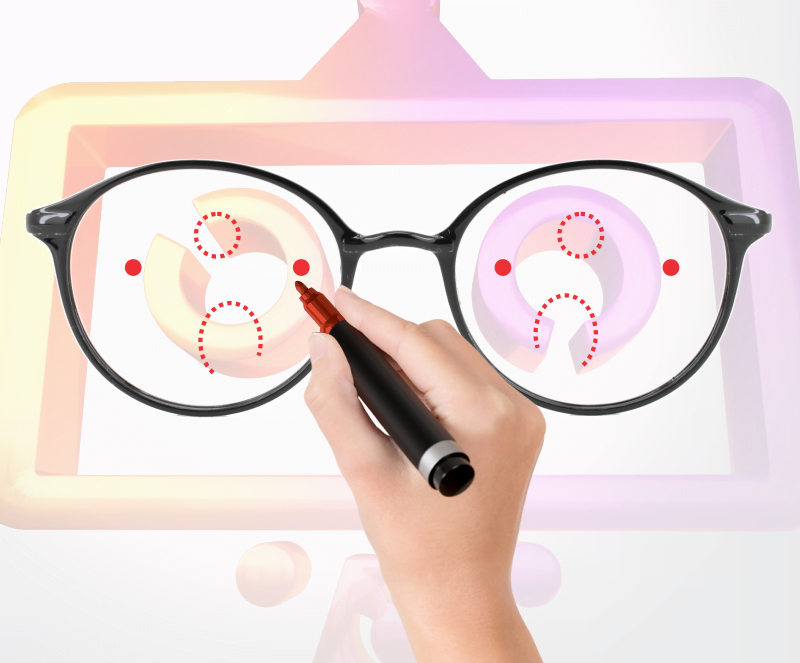
- Mark the temporal and nasal reference points of the progressive lenses.
- Put on the progressive lenses and look through the chart.
- Mark ALL the reference points and areas (Distance reference point, near reference point and fitting cross reference point)
- Start by checking the reading portion of the lens. Look through the cutout that simulates a reading distance and make sure that your patient can see clearly.
- Move to the intermediate portion of the lens and look through the cutout that simulates an intermediate distance. Make sure that your patient can see clearly and that the transition from the reading portion to the intermediate portion is smooth.
- Finally, check the distance portion of the lens by looking through the cutout that simulates a distance of 20 feet or more. Make sure that your patient can see clearly and that the transition from the intermediate portion to the distance portion is smooth.
It’s important to say that it may take a few days for the eyes to adjust to progressive lenses, so don’t be surprised if it takes some time to get used to the different lens powers. If your patient have any concerns about your progressive lenses, it’s best to use the cutout chart and also verify the lenses power and compare to the prescription. The frontal angle, pantoscopic angle, vertex distance, frame size and quality of the lens material can also interfere with adaptation.
In conclusion, using a layout chart or cutout chart is a simple and effective way to verify that progressive lenses that you prescribed are made correctly and that they’ll provide your patients with the clear, comfortable vision they need. By following these steps, you can make sure that the progressive lenses are a good fit for your patients and that they will enjoy the many benefits they have to offer